Rollerwrap using Anchor Method

Wednesday, January 21, 2009

I pretty proficient at rollersetting. A couple of rollersetting challenges will definitely help with that. However, I was never good at using clips in my hair. So I became resigned to having creases in my hair. This made doing a smooth, silky rollerwrap nearly impossible.

While on LHCF one day, there was a thread on the anchor method. Since that day was my wash day, I decided to try it. So I watched Buildable Beauty's youtube video a couple of times and embarked on a new rollersetting adventure.

And boy what an adventure it was! Since this was my first time doing it, it took nearly 25 minutes LONGER than my normal rollersetting time (which is pretty lengthy to begin with--30-40 minutes). So over an hour later I finally sat under the dryer. Well, imagine my suprprise and disappointment when after my normal hour and 15 minutes of drying time my hair still wasn't dry. So I sat under the dryer an additional 45 minutes before my hair was dry.

But I won't totally bore you with the details of my numb butt after 2 hours under the dryer. Here's my process:
  • Pre-pooed with cheapie conditioner and oil
  • Shampooed with diluted shampoo in color applicator bottle and co-washed
  • DCed with Motions CPR and oil
  • Rinsed and towel-dried
  • Applied Lacio Lacio leave-in
After I was dry, I removed rollers, sprayed with ORS Olive Oil Sheen and wrapped overnight. Here are the results...


Not exactly sure how I feel about it. It's ok for a first attempt I guess...Some of the rollers weren't as tight as I wanted...especially the anchor rollers. I guess I'm not pinning it in the right place.

Things I will do differently next time...

  • Just water setting lotion
  • Steam treatment (using Sam Jones homemade method)
  • Smaller rollers for more curl
  • Not so much oil sheen (i like the shine at first, but it weight it down a bit)

I actually look forward to trying this again soon. It's Day 2 and it still looks really good!

Huate & Hair: The Best Flat Irons

Friday, January 16, 2009

I recently read the Dec/Jan issue of Shopsmart, the shopping magazine published by Consumer Reports.

In the article, they tested 9 flat irons, including the ever popular Chi brand. From their testing, they picked 3 smart picks, 1 being a bargain buy.

Smart Splurges


Infiniti Nano Silver by Conair SS9


Bespoke Labs T3 narrow Duality 83145-se

Bargain Buy

Revlon Perfect Heat Ceramic RVST2001C

Wondering where the Chi is?????? So was I. One tester felt that it burned their hair. Another said it took a long time to get hot, then it was too hot.

Now I know for those of us with a coarser grade of hair, the Chi has been a lifesaver. I have even considered getting one. But this has made me broaden my horizon.

I don't think this study rings true for most readers of this blog, but just wanted you to see what other people were saying about our favorite flat irons.

Happy Hair Growing!

The Way I Wash

Monday, January 12, 2009

For the past few months I've been on the co-wash kick. I actually like it and how nice my hair smells afterwards. I can no longer stand my hair smelling at all!!!! It drives me CRAZY...

But I was wondering how clean my scalp was getting. I didn't really want to wash all that often (except when I go to the salon) because I didn't want to strip my hair too much. And then one day I was reading Mane and Chic's blog and the answer appeared (insert heavenly angelic chorus here)...

Shampoo your scalp not your hair. If you're going to use a sulfate shampoo, try diluting it with filtered water and use a color applicator bottle so that the shampoo only gets to your scalp.

So I started doing this January 2, 2009. And can I tell you that I love it! I use a skinny point applicator bottle


and apply diluted shampoo (last time I added a drop of peppermint oil because I was having some itching) directly to my scalp and massage.
I get the cleanliness I desire, without draying out my hair. This is definitely a staple for me in 09!!!!!
Try it and let me know how it works for you...

Bridal Hair Candy...

Thursday, January 1, 2009

I coordinated my cousin's wedding, which was held December 20, 2008.

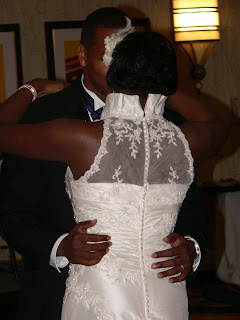
The veil she chose was beautiful, but very, very long! Her dress was absolutely stunning, especially from the back, so we wanted an opportunity to showcase the dress. So I came up with the idea of making some hair candy, or a hair fascinator.
When she arrived at the reception, her hairstylist updated her hair and added the hair accessory.

So for about $10 she had an amazing hair accessory that incorporated flowers from her bouquet and peacock feathers. I didn't do a bad job, if I do say so myself...LOL


Related Posts with Thumbnails